 Ronald's Scribblings
Posts
-
Implementing and Enabling IPv6
Update 1: I’ve added configuration for Ubuntu/Debian derived distributions.
IPv6 is the solution to solving address-space scarcity with IPv4 addressed networks. The next generation solution has been in development since 2001 and has only been seen to be deployed to live-production environments in recent months, no less thanks to World IPv6 Day.
The biggest trouble with migration to IPv6 is that of compatibility. IPv6 and IPv4 hosts are not mutually intelligible—only IPv6 hosts can communicate with IPv6 servers, IPv4 with IPv4. This is a classic case of interoperability failure and Dr D. J. Bernstein has written about the IPv6 deployment mess. Ideally, IPv6 and IPv4 should be compatible which allows seamless transition and graceful degradation for clients that do not yet support the new IPv6. However, to bridge the gap between IPv6 and IPv4, 3rd party, non-native solutions have to be employed, ranging from tunnelling to translation (4in6, 6to4, 6in4, Teredo, NAT64).
Given this very intrusive and labour-intensive requirement in preparing for the eventual total migration to IPv6, I’ll attempt to document my experience in setting up IPv6 connectivity for my home network (to other external IPv6 servers/hosts), to make things easier if your network configuration is similar to mine.
Applicable situation:-
- ISP assigns IPv4 addresses only;
- Router supports IPv6 natively (Linksys routers do not);
- Client(s) support IPv6 natively.
In this post, I shall specifically address configuring a router that is a GNU/Linux machine with sysvinit scripts (and Ubuntu/Debian derived distributions) and radvd (router advertisement daemon—DHCP replacement).
To get IPv6 connectivity when your ISP does not offer direct/native connectivity, one will require a tunnel broker service where all IPv6 packets will be encapsulated in tunnel with IPv4 as the link-layer (don’t fret too much if you didn’t catch how it works technically). I recommend Hurricane Electric’s free IPv6 tunnel broker service. Each account allows you to create up to 5 tunnels, more than enough to support a home network (you’ll only need 1).
To begin, create an account on the tunnel broker site and login. Once done, select “Create Regular Tunnel” option. Fill-in the form, specifying your IPv4 address (issued by your ISP—Don’t worry, this address can be updated dynamically when it changes). Then, verify that a tunnel server that is geographically closest to you has been pre-selected. Finally, click on the “Create Tunnel” button.
On the following page (tunnel details), you will be assigned a tunnel server IPv4 address, a tunnel server IPv6 gateway address, your tunnel client IPv6 address, and a routed IPv6 prefix for your personal use on your network (ISPs in future assign IPv6 address by prefixes, which gives each subscriber ). Take note of these 4 different addresses as you will need them to configure the tunnel later.
For the rest of the document, I’m going to focus on Mandriva Linux (or Ubuntu) as the router. Feel free to follow or adapt accordingly if your machine uses SYSVINIT scripts (or ifupdown). Otherwise, look under the “Example Configurations” tab for copy-paste solutions to other OS (especially for Airport Extreme/Time Capsule users).
Set-up the tunnel by creating the file with the following in /etc/sysconfig/network-scripts/ifcfg-sit1 (Ubuntu/Debian, see below):
    DEVICE=sit1
    BOOTPROTO=none
    ONBOOT=yes
    IPV6INIT=yes
    IPV6TUNNELIPV4=<IPv4 of tunnel server>
    IPV6ADDR=<IPv6 of tunnel client>
    GATEWAY=<IPv6 of tunnel server gateway>
Replacing the last three lines with appropriate substitutions.
Ubuntu users, edit and add the following lines into /etc/network/interfaces:
    auto he-ipv6
    iface he-ipv6 inet6 v4tunnel
        endpoint <IPv4 of tunnel server>
        address <IPv6 of tunnel client>
        netmask 64
        gateway <IPv6 of tunnel server gateway>
        up ip -6 route add default dev he-ipv6
        down ip -6 route del default dev he-ipv6
        post-up echo 1 > /proc/sys/net/ipv6/conf/all/forwarding
Create a default IPv6 route through the tunnel with the following in /etc/sysconfig/network-scripts/route6-sit1 (not necessary on Ubuntu/Debian):
::/0 via <IPv6 of tunnel server gateway> dev sit1Substituting with your assigned addresses as necessary.
Enable IPv6 globally by adding the following to /etc/sysconfig/network (not necessary on Ubuntu/Debian):
    IPV6_DEFAULTDEV=sit1
    NETWORKING_IPV6=yes
    IPV6FORWARDING=yes
Bring up the tunnel with one of the following commands:
    # ifup sit1     # for SYSVINIT only
    # ifup he-ipv6  # for Debian/Ubuntu only
Now, try testing IPv6 connectivity with IPv6 enabled network diagnostic tools.
    $ ping6 2404:6800:800b::63
    $ ping6 ipv6.google.com
    $ traceroute6 ipv6.google.com
You should see valid responses from the commands above. If not, re-check your configuration and try again.
Once you’ve got IPv6 outbound connectivity working, you’ll need to advertise this prefix to the rest of your clients within your network. The radvd will do exactly this for you, but it requires some configuration.
Assuming the internal-facing interface is eth0 and the “Routed IPv6 Prefix” is 2001:470:1:1::/64, in /etc/radvd.conf:
    interface eth0
    {
        AdvSendAdvert on;
        AdvHomeAgentFlag off;
        MinRtrAdvInterval 30;
        MaxRtrAdvInterval 100;

        prefix 2001:470:1:1::/64
        {
            AdvOnLink on;
            AdvAutonomous on;
            AdvRouterAddr on;
        };
    };
Restart radvd to have the entries take effect.
Now, your clients within your network will automagically be configured with an IPv6 address with your assigned routed prefix. Amazing isn’t it? Visit http://www.kame.net/ to see the dancing turtle. You may also want to check out the IPv6 connectivity test at http://test-ipv6.com/.
If you intend to have your router accessible by a public IPv6 address, assign an IPv6 address from your prefix to your external interface.
Assuming your external interface is eth1 (and that your routed IPv6 prefix is 2001:470:1:1::/64), add the following lines to /etc/sysconfig/network-scripts/ifcfg-eth1 (Ubuntu/Debian see below):
IPV6ADDR=2001:470:1:1::1You can assign any number (after the ::) to your network interface, but I chose 1 in this example.
On Ubuntu/Debian, edit and add to /etc/network/interfaces:
    iface eth0 inet6 static
    address 2001:470:1:1::1
    netmask 64
Reload the interface by doing the following (applies to both Ubuntu and SYSVINIT):
# ifdown eth1; ifup eth1Your router will now be accessible externally via IPv6.
If you have your own domain name, you may want to add the IPv6 address as an ‘AAAA’ record.
This concludes my brief walkthrough/HOWTO on enabling IPv6 connectivity through an IPv4-only ISP. Feel free to email me or comment below for clarifications.
· · · -
The Hit List
Believe it or not, The Hit List’s iOS Companion App by The Potion Factory is finally released after 2.5 months of being rejected and resubmitted.
To be honest upfront, I was a user of Cultured Code’s Things but I got annoyed, frustrated and dissatisfied with the roadmap and progress of Things, both on the Mac and iOS front. Things’ Cloud-based Sync has been in the works for nearly 2 years and a private invite-only beta has only just been launched, syncing between Macs only. Their development speed and customer responsiveness regarding its future development plans is just plain awful.
Surprisingly, The Hit List (THL), once seen to be abandoned for being untouched for 2 whole years, suddenly came back to life and graduated to a version 1.0 release. In addition, Cloud-based Sync was functional and available out of the box, albeit not free (but affordable). Cultured Code and Things still do not have anything to show nor deliver.
I jumped at migrating to THL immediately since I already had a license to it from my MacHeist bundle, and the architecture of Things limiting my workflow and organisation of tasks had already got me looking for alternatives. THL is immensely more flexible and resilient.
I bought the THL iOS app the moment it was announced to be approved and redeemed my MacHeist complementary 3 months free Sync subscription.
Setting up sync was a breeze on both the Mac and the iOS application. Fill in your username and password and an initial full-sync will be performed. Subsequent syncs are blazingly, unbelievably fast. Even faster than the WiFi sync solution that Things has.
Overall, the THL iOS app is a good subset of the features available on the Mac, nothing missing of show-stopper severity, and I believe that most user feature request will be satisfied in subsequent updates.
For more usability information, AppAdvice has written a rather reasonable review of THL iOS app.
If you’re wondering between Things, THL, and OmniFocus, here’s an analogy that you might want to consider. Things is the simplest and least complex (possibly more restrictive) of the lot, while OmniFocus is the most complex and flexible (possible feature overloaded and expensive). THL falls between the two applications nicely, with a good price. So, if you find OmniFocus too complex and want something slightly simpler, THL may be the task management application that you’re looking for. Give them all a whirl to see what suits you best.
· · · -
Lion Wireless Access in SMU
Update 1: I’ve tested the profile and found that it doesn’t not work due to certificate issues. I’ve updated v0.2 of the profile and I hope it solves the problem.
Update 2: There have been infrastructural changes, i.e. WLAN-Student is depreciated by WLAN-SMU. Hence, please refer to SMU Macness’s Configuration Guide for Mac users and ignore the configuration profile on this post. Their instructions supersede that of here.
Singapore Management University (SMU) employs 802.1X authentication for its wireless network access. Mac OS X has always had certain kinks when dealing with multiple 802.1X profiles, such as SMU’s and Wireless@SGx’s.
Apple has changed the 802.1X configuration screen for Mac OS X Lion. End-users are no longer able to manually add 802.1X configuration profiles within the Advanced Network Preferences panel. All 802.1X configurations are now managed by a “configuration profile”, provided by a systems administrator. I hope this redesign increases the stability and reliability of the 802.1X mechanism in Mac OS X.
Well, you may ask, what is a “configuration profile”?
Apparently, it’s quite simple. They are the same .mobileconfig profiles used for iOS devices and the same Apple iPhone Configuration Utility can generate compatible profiles for Mac OS X Lion.
For your convenience, I’ve provided an untested configuration profile here, that will configure your SSID to WLAN-Student and to use 802.1X, according to the credentials you supply when you install the profile onto your computer.
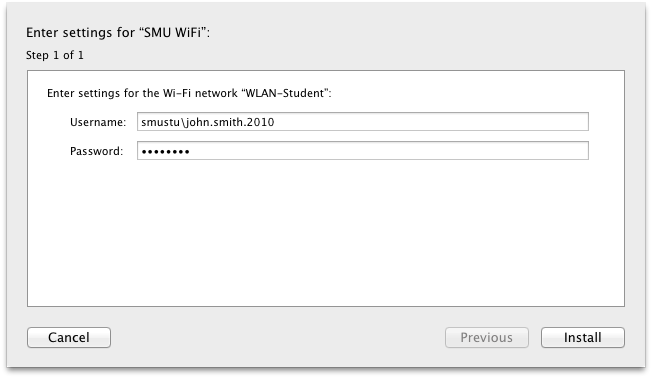
Do look through the contents of the profile before installing and ignore the warnings that the profile is unsigned. I will provide further updates to the profile when I have a chance to conduct some field tests.
I hope this helps the early adopters out there.
Download: Lion Wireless 802.1X Configuration Profile for SMU v0.2.
· · · -
Lion
I’ve succeeded and my backups worked flawlessly. The only problem was that it took way too long to copy files from my backup to my main drive.
Applications that I’ve installed so far are working rather well. Roaringapps.com has an application compatibility list for Lion. Do take a look before upgrading.
That aside, I’m loving how Lion is a little snappier in the interface and it comes with iPhone’s autocorrect. It’s just that the scrolling requires some getting used to. I’ll post more when I’ve got more to say.
· · ·